By David Frost
I used to spend too much time on eBay searching for jerseys”¦time I could spend cutting/sewing for my collection or for a paying customer. Best advice I can give a DIY’er to get exactly what you want:
- • Get to know your local screen print guy. These guys always have tons of catalogs from suppliers. Check ”˜em out and ask if you can piggyback a few blanks onto their next order. Granted, these are not usually the highest quality Rawlings or Majestic jerseys, but you’re at least getting a new clean jersey as your canvas. These guys are constantly getting hosed by people who get shirts done then never pay, so if you go in saying that you’ll pay cash, they will listen.
• For better quality blank jerseys: Get on the website of the manufacturer of your preference and obtain the contact info of the rep for your region. These reps have to buy samples to take to customers, and are often “stuck” with these samples when the new style comes out the following year. Sometimes these are the same people that list blanks on ebay, so befriend them and get what you need before they list it.
• Stockpile a few to have on hand when you get a great idea or better yet a great price.
I always start with blank jerseys and research thanks to Dressed to the Nines and Chris Creamer’s website. A blank jersey is like a clean piece of canvas.
As for braid, again, you can’t find braid just lying around or at a fabric store, but you’d be shocked how much of it is literally lying on the floor of different jersey manufacturers’ plants. Call these plants (sometimes they have an outlet) and ask for customer service or anyone you can find who will at least send a few snips of what they have available. Depending on thickness and number of colors, I’ve paid between $.05 and $.80 per foot.
When I can’t find braid that I need, I make my own, utilizing the braid I can get my hands on and twill to mount that braid on.
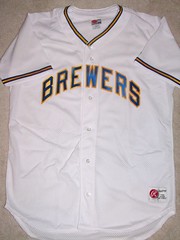
If I need to make some “homemade braid” for a Seattle Pilots jersey or a ’71 Brewers, I start by drawing straight lines on the front of the gold twill. The lines serve as guides to lay the 3/16” royal braid onto. The size of the twill needed is depending on the size of the stripe. For the Pilots, I space each royal stripe 1/2” apart. With royal 5 stripes, my twill is 2” tall and 19” long. For the Brewers, my royal stripes are 5/16 of an inch apart so with only 2 royal stripes, by twill is about 13/16” inches wide and 19” long. Nineteen inches should be long enough to go around most sleeves up to a 2XL jersey.
I get the braids as straight as I can and secure them with thin dabs of a product called Liquid Stitch, which you can find at any Wal-Mart. With the glue still wet, I maneuver the braid as straight as I can with a metal ruler, then allow usually a day to dry. The following day, I sew each braid to the twill with a simple straight line stitch.
I use a fabric scissors to ensure the straightest cut as I trim access twill from the sides. This makes sure that royal braid is truly the perimeter to the treatment.
If doing straight line piping like on sleeve ends, fastening to a jersey is no problem — just put it under a heat press. The twill the braid is mounted on has a heat-adhesive backing, so once in place, sew directly to the jersey.
If you don’t have a heat press or are creating horseshoe collars/curves treatments, it’s a whole different story. It’s painstaking, but I pin the braid to the jersey every inch or so. The tighter the curve, the more frequent the pins. Once secured, sew directly to the jersey with a straight line stitch.
I’ve created dozens of logos and chest insignia on templates made from card stock, so I can re-create them again if needed. Each is kept in a separate envelope and in a flat space so they can lay flat and don’t curl. Heavier-weight stock, of course, is less prone to curling.
Some of my art is hand-drawn, while most MLB jersey logos, etc. are from Chris Creamer’s Sports Logos page. I don’t know CAD, but am somewhat handy at Illustrator. I shoot a copy for each color or layer needed, to once again speed the process to recreate and to insure the best uniformity of the outline(s).
I trace the templates on to the back of the twill to ensure no pen marks, so of course the letters need to read backwards. I cut everything by hand. A fabric scissors is a great investment, as it keeps the edge of the twill intact. A steady hand is helpful as well.
I line up the layers and check for bad edges and outline uniformity before placing the letters under the heat press and onto the jersey.
The zig-zag stitch is standard of course, and you can determine the width of that on the machine. Most sewing machines have a dial that you can select the frequency or tightness of the stitch. The tighter the stitch = the less chance of the twill fraying after washing. On my machine, the desired setting is a .5 — whatever that means. Uses a little more thread, of course.
All sleeve treatments and art have been attached and are ready for all parts to be sewn on. A jersey like this probably needs about 1.5 hours of sewing time, which does not include numbers. If anyone ever requests me to sew a name on this jersey, I refuse. I try to make all jerseys as specific to the period as possible. Some fonts I have on file; others are supplied by the one and only Bill Henderson.
Here’s the finished product. Total time from start to finish was about three hours. More art or customization means more time. Sleeve patches again add finish to any jersey. Depending on the team, Willabee & Ward patches are always available on eBay, or sometimes (if the art is too involved) I make my own.